Bathroom Vanity Remodeling

This is a day to day description of how I remodeled my bathroom and installed a new bathroom vanity.

Monday, May 08, 2006

The finishing touch


I bought a soap dish, a wastebasket, and a glass shelf with towel bar.
Now all I need is a new mirror. That comes later.

What do you think? Please leave me a comment.

Sunday, May 07, 2006

Storage


I lost some storage space because the old vanity had three drawers that I don’t have anymore.


This gave me the opportunity to get rid of some unneeded stuff I had lying around and after buying some handy plastic boxes everything looks nice and tidy now.

Saturday, May 06, 2006

Water flowing


Here is a close up of the faucet in action. Hot and cold ware flowing nicely, smoothly, effortlessly, naturally, ...

Friday, May 05, 2006

The faucets


And now, ladies and gentlemen, with the installation of the faucet the job is complete. Everything clean and new, working perfectly: I’m loving it. To celebrate I got two Big Mac’s at McDonalds: I’m loving it.

Thursday, May 04, 2006

Plumbing


Before installing the faucets comes a very tricky part: plumbing underneath the vanity. I spent a couple of days with this problem.

The new pipes you get at the store don’t fit snug into the old system because of a slight difference in diameter. :-( This means that, because of the water pressure, you get leaks. Not bad leaks but bad enough.

I finally managed to get it under control with the use of duct tape and other types of tapes. Lots of tabpes... Also, silicone helps a lot.

I’m really happy it’s all over.

Wednesday, May 03, 2006

The countertop


This next step completes the vanity as bought in the store (Home Depot) by installing the counter top with the wash-bowl. All you need to do is put some silicon on the edges of the vanity and put the counter top on it. Let it dry for about a day.

Tuesday, May 02, 2006

Installing the vanity


Everything is now prepared so that we can begin installing the vanity. The countertop (with the wash-bowl) needs to be installed separately. You just glue it on top – that's what it says in the manual.

This vanity you see here comes pre-assembled when you buy it. If the trunk of your car is not large enough you are in trouble.

Monday, May 01, 2006

Done tiling


Now it’s time to finish the tiling process. Wash the tiles clean. Then use caulk to fill the gaps between the tiles. This makes the gaps look bright white. Again wash away the remaining caulk with a sponge and lots of water. Now polish the tiles with a regular floor cleaner.
Look how shiny they are. Yeah, that’s what I’m talking about.

Sunday, April 30, 2006

Tiling the floor


Now it’s time to work on the floor. The rest of the bathroom has these nice looking white and dark blue tiles so that’s what I needed to install here. First you need to get the floor all clean and even or you won’t have much fun tiling.
After that put down the grout (I used premixed unsanded – quite expensive) and lay the tiles. First one corner then the other one. Also wash away the grout on top of the tiles as soon as possible (before it gets hard and you’ll need to scrape) with a big sponge and lots of water.

Saturday, April 29, 2006

Done painting


In no time painting is done. Whether it looks professional enough is another question. The area around where the tiles had been removed still sticks out but since this area will be partially covered by the new vanity I decided to live with it.

Friday, April 28, 2006

Painting the walls


Now I need to paint to wall. First I fixed the holes with “stucco patch”. Then I sprayed some “Knockdown Texture” on the wall where the tiles used to be. This stuff makes the wall rougher to match the texture of the rest of the wall. It’s not perfect but it’s good enough.

Thursday, April 27, 2006

Wall tiles are history


After a not so long while I managed to remove all wall tiles. You can see a lot of dead tiles on the floor in that one picture.
Another problem becomes apparent: the bathroom wall where the times were needs to be painted but it’s not of the same texture as the rest of the walls.

Wednesday, April 26, 2006

Attacking the wall tiles


Now it’s time to attack the wall tiles. These were put around the counter top and are the small grayish ones. This may have been neat in the 80’s but it is ugly now.
The problem is that you can’t remove them easily since they were glued to the wall. I tried hammering the front but it didn’t work. They just wouldn’t break. The only option was to use a screwdriver as a wedge and hammer them off that way. Of course each time a dent was left in the wall. Also, the neighbors must have enjoyed the hammering.

Tuesday, April 25, 2006

Old is gone


Oh glorious moment! Finally all of the old vanity is gone and found a new home – the trash. I expected to find lots of dead insects, spiders, ants and what not on the floor but to my surprise it was quite clean. About a year ago I saw an ant crawling underneath the vanity. And yes, this was one big black mother of an ant.
Also it became apparent that nobody had taped an envelop full of money to the underside of the floors or something like that. So, no monetary compensation for me.

Monday, April 24, 2006

Tear down these walls


And the fight against the evil 80’s vanity continues. I managed to tear down a couple of side walls and pull some wood beams from the walls. Working there I felt quite safe from all kinds of rays since the gazillion nails they used would sure make for an excellent radioactivity shield. A true confession to creative craftsmanship.

Sunday, April 23, 2006

Counter top bites the dust


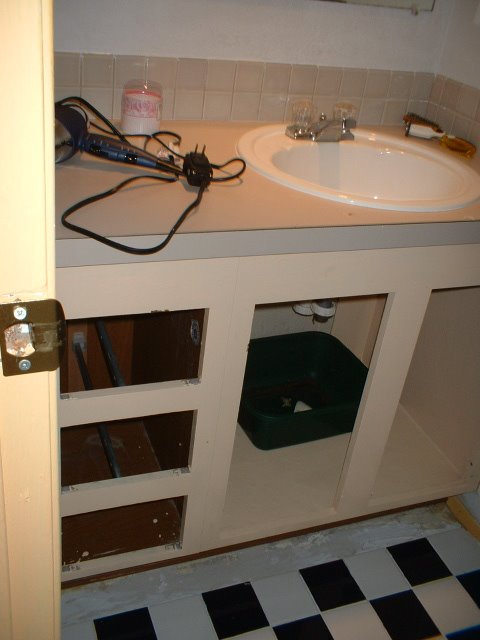
After a long struggle I managed to pull the counter top off the other parts. It was held in place by numerous screws and nails randomly placed underneath it. There were short and long screws, short and long nail. I used a hammer as a wedge whenever I could but soon I found out that pressing against the bathroom walls only damages the wall. All in all this is a day’s work. I wish I had had a saw.

Saturday, April 22, 2006

Plumbing


Here are two pictures of the pluming coming out of the wall. You see the hot and cold water pipes and the waste water (not sure about that name) that goes back.

Friday, April 21, 2006

Removing the old sink


Here I’ve removed the sink from the counter top. This was a bit messy since you have to disconnect the water first, which involves crawling (first make sure to close the valves) all the way inside the cabinet and working on your back. The beam in the middle, which used to be between the two doors, doesn’t exactly help either. Once this was accomplished I found the sink is held in place by four small screws. Unscrew those and the sink comes out easily.

It turned out that the sink is not exactly high quality. I saw the same faucets for $20 in the store. The cheapest there are.

Thursday, April 20, 2006

Removing doors and drawers


The first step was a piece of cake. I removed the doors and drawers from the old vanity. This was no problem at all since all I needed was a screwdriver. I knew the next stage wouldn’t be so easy.

Wednesday, April 19, 2006

Original bathroom vanity


This is the original bathroom vanity from when I bought the condominium in 1998. It’s a safe guess that this was the one they put in when they built the apartments in 1980. It’s an eye sore and since I recently tiled my floor I though I needed something nicer.